
Your Camera : An Introduction to Exposure
“I’ve got a really nice camera, but I don’t really know how to use it”
I wish I had a pound coin for every time I’ve heard that! Now some people who tell me this are from the ‘got all the gear but no idea’ brigade (though most of that lot would never admit to not knowing how to use their kit). Many more are camera owners who have genuinely wanted to learn about photography, but have never had the time or the opportunity to learn about taking control in the use of their cameras. So, you want to take a bit more control of your nice posh camera? Afraid you’ll need to learn a little bit of theory then! As with all new skills and techniques, there is a modicum of theoretical stuff to learn. So I’ll make this as painless as possible, but stick with it; it will be worth it I promise
Photography is all about the light
Sounds obvious I know, but getting a properly exposed photograph is down to getting the correct amount of light into the camera; and this can be achieved by adjusting three main settings:
- The amount of time that light is let in (The Shutter Speed)
- The size of the hole that lets in the light (The Aperture of the lens)
- How light sensitive is the sensor in the camera (known as The ISO) – in the old days we used to call it the Film Speed
But each of these three variants has certain effects on the picture:
- A fast shutter speed will freeze movement, but lets in less light – a slower speed, whilst letting in more light may result in a less sharp or even a blurred image
- A small aperture will keep more of the shot in sharp focus, but let in less light – a wider aperture, whilst letting in more light results on less of the scene being in focus (the foreground and background may be blurred). Notice how your eyesight gets more in focus if you squint? It’s the same principle as narrowing down the aperture of a lens.
- A ‘fast’ ISO setting (more sensitive) means that the correct exposure can be achieved with less actual light getting in the camera, but will result in a grainier image. A ‘slow’ (less sensitive) ISO needs more actual light, but gives a better quality image.
So if you have a think about this for a few moments, you can see that getting the desired shot often means compromising one thing against another – particularly when the available light is not so great (overcast weather, at night or indoors).
It’s this basic trio of factors with which we photographers battle, seek to control and try to second guess in order to get the shots they want. Shoot a portrait in good light with a slowish shutter speed and a small aperture and you’ll end up with a well-exposed photo with everything sharp – the same shot with a fast shutter speed and wider aperture could give the same exposure ‘value’ but may be more effective as the blurred background gives more emphasis to the subject. Shooting in automatic mode may not give you quite the shot you expect, even though it will usually be correctly exposed. Understanding and keeping control over one, two or all three of these settings is more likely to get you the kind of shot you want.
Let’s look at a bit more detail at these settings – get your camera out and we’ll also see how they are represented (numbers I’m afraid) and what happens when you adjust them. You can usually make these adjustments with a small ‘thumbwheel’ somewhere near the shutter button. If you’re unsure where this is, you might need to refer to your user manual (or have a look online).
Shutter Priority
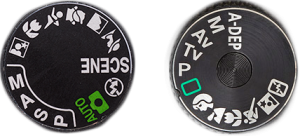
First of all, grab hold of that camera and for the first time ever, you’re going to click it off Auto and put it in a semi-automatic or ‘Priority’ mode! Scary eh? The one we want is ‘S’ on the Nikon, ‘TV’ on the Canon. Sensibly with Nikon, this stands for Shutter (for some reason Canon have chosen to call it Time Value); but most of us refer to it as ‘Shutter Priority’ no matter which brand we use. Shutter Priority lets you set the shutter speed and the camera will set the appropriate aperture.
Shutter speed is expressed in fractions of a second – 1/100 is therefore not as fast as 1/500 and on your camera it will be adjusted by the control wheel. So try this as you look at the settings on the screen, or on a more advanced model you may have a display on the top of the camera – you should see one of the number values change as you click the wheel. You should see a number changing – 1000, 500, 250, 100, 60, 30 or something similar, that’s it; you’re changing the shutter speed.
The main thing to remember with shutter speed is that slow means more chance of blur either because you have not kept the camera completely still or that your subject has moved. A faster shutter speed freezes the action both of your unsteady hand and of the subject.
Aperture Priority
So let’s have a look now at the Aperture Priority Mode – click your mode dial to A (Nikon) or AV (Canon). This mode lets you change the aperture whilst the camera sets the necessary shutter speed to get the exposure right.
Aperture is also measured in numbers and the larger the number, the smaller the size of the aperture. F3.5 might be the widest aperture on your lens and you can probably then click it right down to F22 or even more.
As mentioned earlier, aperture affects the amount of the picture that stays in focus (known as Depth of Field). A wide aperture (lower number) results in shallow Depth of Field which is particularly useful when taking portraits (a nice blurred background). A small aperture is more effective for landscapes when you want the whole shot to be in focus.
ISO
Finally, the third part of the trio is ISO. If you are really interested in what it stands for, it’s ‘International Organization of Standardisation’. Bet you’re sorry you asked now! Just to remind you, ISO is a measure of how sensitive the camera’s sensor is to light. A lower value is less sensitive (so you need more light to expose the image, a higher value means you can use a faster shutter speed and/or a narrower aperture, but the image will suffer from being more grainy.
You can make ISO adjustments by pressing the ISO button and using the control wheel to change the value. In most normal conditions keeping your ISO set to 100 or 200 is fine. You’ll get the best quality in terms of graininess and the camera’s sensor will handle things well in reasonable shooting conditions. You might want to increase the ISO if you are shooting in poorer light, indoors or if you need particularly fast shutter speeds (maybe shooting fast action sports).
To summarise then:
- Set Shutter Priority to take control of the shutter speed – this is useful if you’re shooting sports or other fairly fast action.
- Set it to Aperture Priority if you want to take control of the aperture size and the resulting changes to depth of field. For portraiture, a shallow depth of field is attractive, for a landscape you want pretty much the whole scene in focus, so will need the aperture to be smaller (bigger number).
- Adjust your ISO if the ‘normal’ setting of 100 or 200 doesn’t allow you a fast enough shutter speed for what you need – maybe increase it to 800. You may need to increase the ISO ‘speed’ when taking photographs in low light.
As each value doubles, the amount of light halves – half the amount of light enters the camera with a shutter speed of 1/200 than with 1/100. Similarly half the light gets in through an aperture of f16 than through f8. And ISO also doubles/halves in the same way (ISO 100 is half as sensitive as 200). In principle, if you double one value, you must half another to achieve the same exposure value. Simple isn’t it!!!!
If you get used to using one of the semi-automatic modes rather than fully auto in everyday use you’ll soon get to grips with getting real control over exposure and the style of photographs you want to take